What Equipment Do I Need to Start an Iris Photography Studio?
To start an iris photography studio, you need a macro-capable camera, 85-105mm macro lens, proper lighting, and stable tripod. Budget setups start at €1,000-€1,300, while professional studios require €5,000-€7,000+. The key is choosing equipment that matches your budget and business goals.
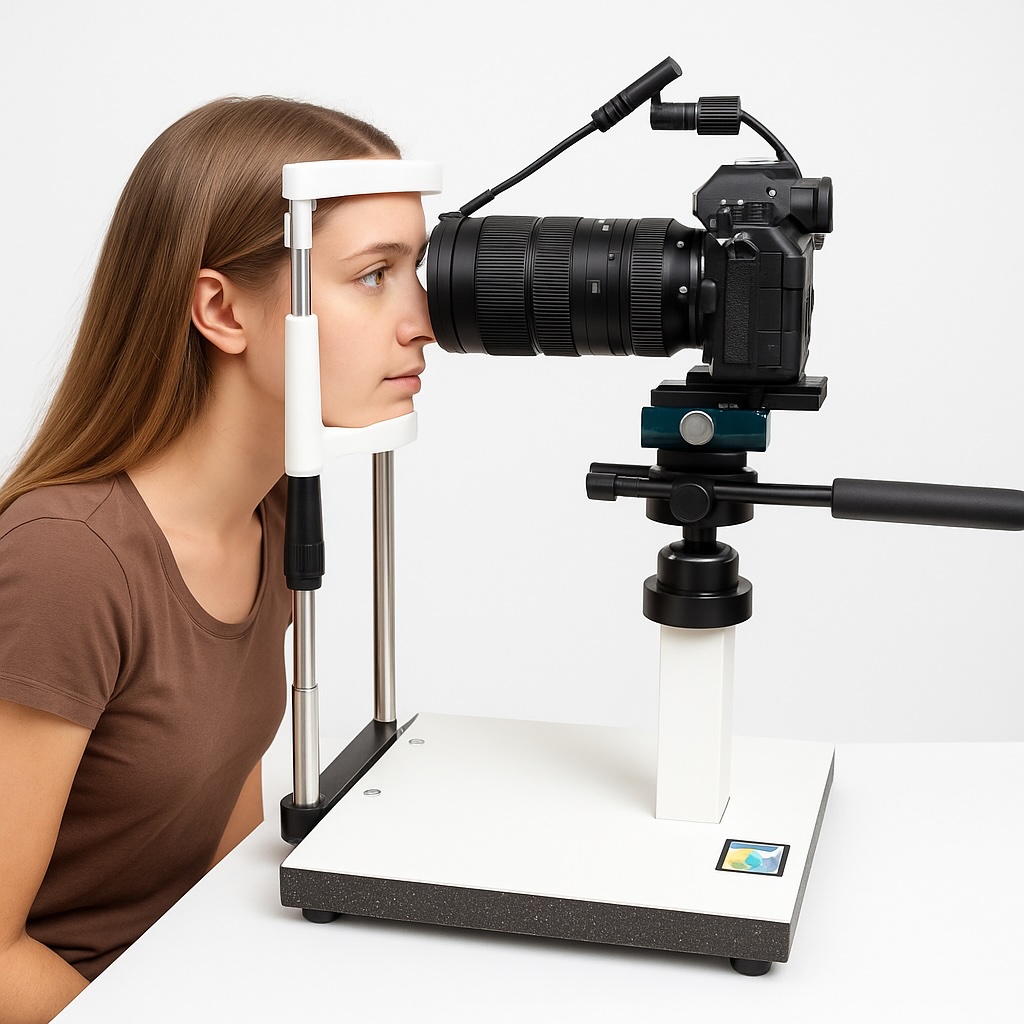
Professional iris photography requires specialized macro equipment to capture stunning eye detail
What Is Iris Photography?
Iris photography is a fast-growing trend that turns the human eye into stunning, high-detail art. Whether you're starting a side business or launching a full-scale studio, choosing the right equipment is essential for capturing the intricate patterns and colors that make each iris unique.
To achieve the ultra-detailed close-up images that iris photography demands, you need specialized macro photography equipment. This includes a high-resolution camera, dedicated macro lens, proper lighting to illuminate the eye safely, and stable support to ensure tack-sharp focus.
Key Equipment Categories
Essential Components
- • High-resolution camera body
- • Dedicated macro lens (85-200mm)
- • Professional lighting system
- • Stable tripod with macro rail
Optional Accessories
- • Chin rest for client stability
- • Polarizing filters
- • Extension tubes
- • Remote shutter release
Budget Setup (~€1,000–€1,300)
Best for: Beginners, side hustlers, creatives testing the market
Budget Equipment Recommendations
| Component | Recommended Gear | Est. Price |
|---|---|---|
| Camera | Nikon D3500 (24MP DSLR) | €400-500 |
| Lens | Nikon 85mm f/3.5 DX Micro | €500-600 |
| Lighting | Neewer LED Ring Light | €80-120 |
| Tripod | Slik Sprint Pro III or similar | €100-150 |
Pros of Budget Setup
- Affordable entry: Low barrier to start iris photography
- Decent sharpness: Good results with proper technique
- Lightweight: Portable and beginner-friendly
- Learning platform: Perfect for skill development
Cons of Budget Setup
- Lower light power: Can lead to motion blur
- Close working distance: Camera very close to client's face
- Manual focus: Minimal automation features
- Limited enlargement: Smaller maximum print sizes
Pro Tip for Budget Setup
Use a remote shutter release and maintain good posture to reduce camera shake. Focus manually and take multiple shots to ensure at least one is perfectly sharp.
Medium Budget Setup (~€2,500–€3,500)
Best for: Semi-pro photographers, small studios, weekend events
Medium Budget Equipment Recommendations
| Component | Recommended Gear | Est. Price |
|---|---|---|
| Camera | Canon 90D (32.5MP APS-C DSLR) | €1,200-1,400 |
| Lens | Canon 100mm f/2.8 Macro (L version optional) | €600-900 |
| Lighting | Godox MF12 Twin Flash or Yongnuo Ring Flash | €300-500 |
| Tripod | Manfrotto 190XPRO + macro focusing rail | €400-600 |
Pros of Medium Setup
- Better working distance: Camera doesn't need to be in client's face
- Flash freezes motion: Eliminates eye movement blur
- Great autofocus: Fast and accurate focusing system
- Durable build: Professional-grade construction
Considerations
- Learning curve: Requires understanding flash setup
- Heavier gear: Less portable than budget setup
- Power requirements: Need batteries for flash units
- Setup time: More complex equipment configuration
Pro Tip for Medium Setup
Position twin flashes at 45° angles to reduce glare and reveal iris texture better. This setup provides even illumination while minimizing reflections on the eye's surface.
High-End Studio Setup (~€5,000–€7,000+)
Best for: Full-time studios, art galleries, premium clients, scientific/medical use
High-End Equipment Recommendations
| Component | Recommended Gear | Est. Price |
|---|---|---|
| Camera | Nikon D850 (45.7MP full-frame DSLR) | €2,500-3,000 |
| Lens | Nikon 105mm f/2.8 VR Macro or 200mm f/4 Micro | €900-1,500 |
| Lighting | Polarized twin strobes OR Adaptalux flash + LED | €1,000-2,000 |
| Support | Gitzo tripod with geared head + chin rest | €800-1,200 |
Pros of High-End Setup
- Unmatched quality: Gallery-quality prints at large sizes
- Maximum control: Precise light, reflection, and sharpness control
- Consistent results: Professional-grade reliability
- Scientific precision: Suitable for medical/research use
Considerations
- High learning curve: Requires advanced technical knowledge
- Expensive investment: Significant upfront cost
- Heavy equipment: Not suitable for mobile work
- Fixed location: Best for dedicated studio space
Pro Tip for High-End Setup
Use cross-polarized lighting to eliminate glare on the eye and reveal deeper iris patterns. This technique involves polarizing both the light source and camera lens at 90° angles for maximum detail capture.
Complete Setup Comparison
Budget vs Medium vs High-End Comparison
| Feature | Budget Setup | Medium Setup | High-End Setup |
|---|---|---|---|
| Total Cost | €1,000-€1,300 | €2,500-€3,500 | €5,000-€7,000+ |
| Image Quality | Good | Excellent | Professional |
| Working Distance | Very close | Comfortable | Optimal |
| Ease of Use | Beginner-friendly | Moderate learning | Advanced skills |
| Portability | High | Medium | Low |
| Best For | Testing market | Small studios | Premium studios |
Essential Accessories & Bonus Tools
Beyond the core equipment, several accessories can significantly improve your iris photography results and client experience. These tools help with precision, stability, and image quality.
Helpful Accessories
- Macro focusing rail: Micro-adjustments for perfect focus positioning
- Chin rest: Stabilizes client's head during shooting
- Polarizer filters: Reduce reflections on the eye surface
- Extension tubes: Increase magnification when needed
Professional Upgrades
- Wireless remote: Eliminate camera shake completely
- Eye drops: Help clients with dry eyes for better shots
- Color checker: Ensure accurate color reproduction
- Tethering cable: Live view on larger screen
Which Setup Should You Choose?
Start with Budget
If you're just testing the waters and want to learn iris photography basics.
Perfect for: Beginners & hobbyists
Choose Medium
If you want reliable, professional results and plan to charge clients.
Perfect for: Small studios
Invest in High-End
If you're building a premium brand and want gallery-quality work.
Perfect for: Premium studios
Key Takeaway
No matter your starting point, prioritize a sharp macro lens and quality lighting — they make the biggest difference in iris detail.
You can always upgrade your camera or tripod later as your studio grows and revenue increases.
How Eye.Photo Enhances Any Equipment Setup
Professional Post-Processing for Every Budget Level
AI-Powered Enhancement
- Transform budget photos into professional results
- Enhance iris detail and color accuracy
- Remove reflections and imperfections
- Optimize contrast and sharpness automatically
Studio Integration Benefits
- 30-second processing saves time
- Consistent artistic style across all images
- High-resolution output for any print size
- Impress clients with professional results
Frequently Asked Questions
Can I use a regular camera for iris photography?
While any camera can technically take close-up photos, iris photography requires macro capabilities to capture the fine detail needed. You need either a dedicated macro lens or a camera with excellent close-focusing ability. Regular kit lenses typically can't get close enough for professional iris photography.
What's the most important piece of equipment to invest in first?
The macro lens is the most critical component. A good macro lens on a budget camera will produce better iris photos than an expensive camera with a poor lens. Look for a true 1:1 macro lens in the 85-105mm range for the best working distance and image quality.
Do I need special lighting for iris photography?
Yes, proper lighting is essential. Regular room lighting isn't sufficient for the close-up work required. You need either LED ring lights for budget setups or dedicated macro flash systems for professional work. The lighting must be bright enough to allow fast shutter speeds and small apertures for maximum sharpness.
How much can I charge for iris photography with budget equipment?
Even with budget equipment, you can charge €20-50 per session if you master the technique and post-processing. The key is delivering sharp, well-lit images with good composition. As you upgrade equipment and skills, you can increase prices to €75-150+ per session.
Should I buy new or used equipment?
For cameras and lenses, used equipment can offer excellent value, especially from reputable brands like Canon and Nikon. However, be cautious with lighting equipment and tripods, as these take more wear. Always test used gear thoroughly before purchasing, and buy from trusted sources with return policies.
Start Your Iris Photography Journey Today
Iris photography offers an exciting opportunity to combine artistry with technology, creating unique and meaningful images that clients treasure. Whether you start with a budget setup or invest in professional equipment, the key is understanding your gear and mastering the techniques.
Remember that equipment is just one part of the equation. Practice, patience, and post-processing skills are equally important for creating stunning iris photographs. Start with what you can afford, learn the fundamentals, and upgrade gradually as your skills and business grow.
Ready to Start Your Iris Photography Studio?
Combine the right equipment with Eye.Photo's professional processing to deliver exceptional results that wow your clients.